Email Integration
Connect your customer-service mailbox to Vibe Seller and the AI can pull up the inbox while running a task, sort messages the way you want, and draft and send replies — no more copying and pasting between windows. If you don't want the AI sending from a mailbox, turn off that mailbox's email sending permission.
Everything runs over standard IMAP / SMTP. You never type your email password — 163 and QQ Mail use an authorization code, Gmail uses an app password. Each provider section below shows exactly how to get one.
Where each integration is configured and how they divide up: see the Integrations overview.
What you need
- A mailbox you use (163 / 126 / yeah.net, QQ Mail and Gmail are all supported);
- Its authorization code (or Gmail app password) — one short section per provider below;
- Outlook / Hotmail is not supported — see the FAQ.
NetEase Mail (163 / 126 / yeah.net)
The steps are the same for all three domains — the server settings get filled in automatically, so you only deal with the authorization code.
Step 1: Get the client authorization code
- Sign in to the web mail (126: email.126.com, yeah.net likewise), click Settings → POP/SMTP/IMAP at the top;
- Turn IMAP/SMTP service on (IMAP is recommended — it stays in sync with the web mail);
- Click "Continue" in the dialog and verify by SMS (scan the QR code or send the message manually);
- A 16-character authorization code appears — it is shown once, so copy it right away. One code can serve several clients; use "Add authorization password" whenever you need a fresh one.
Full illustrated steps: NetEase help How to enable client protocols.
Step 2: Add it in Vibe Seller
Open Settings → Email in Vibe Seller:
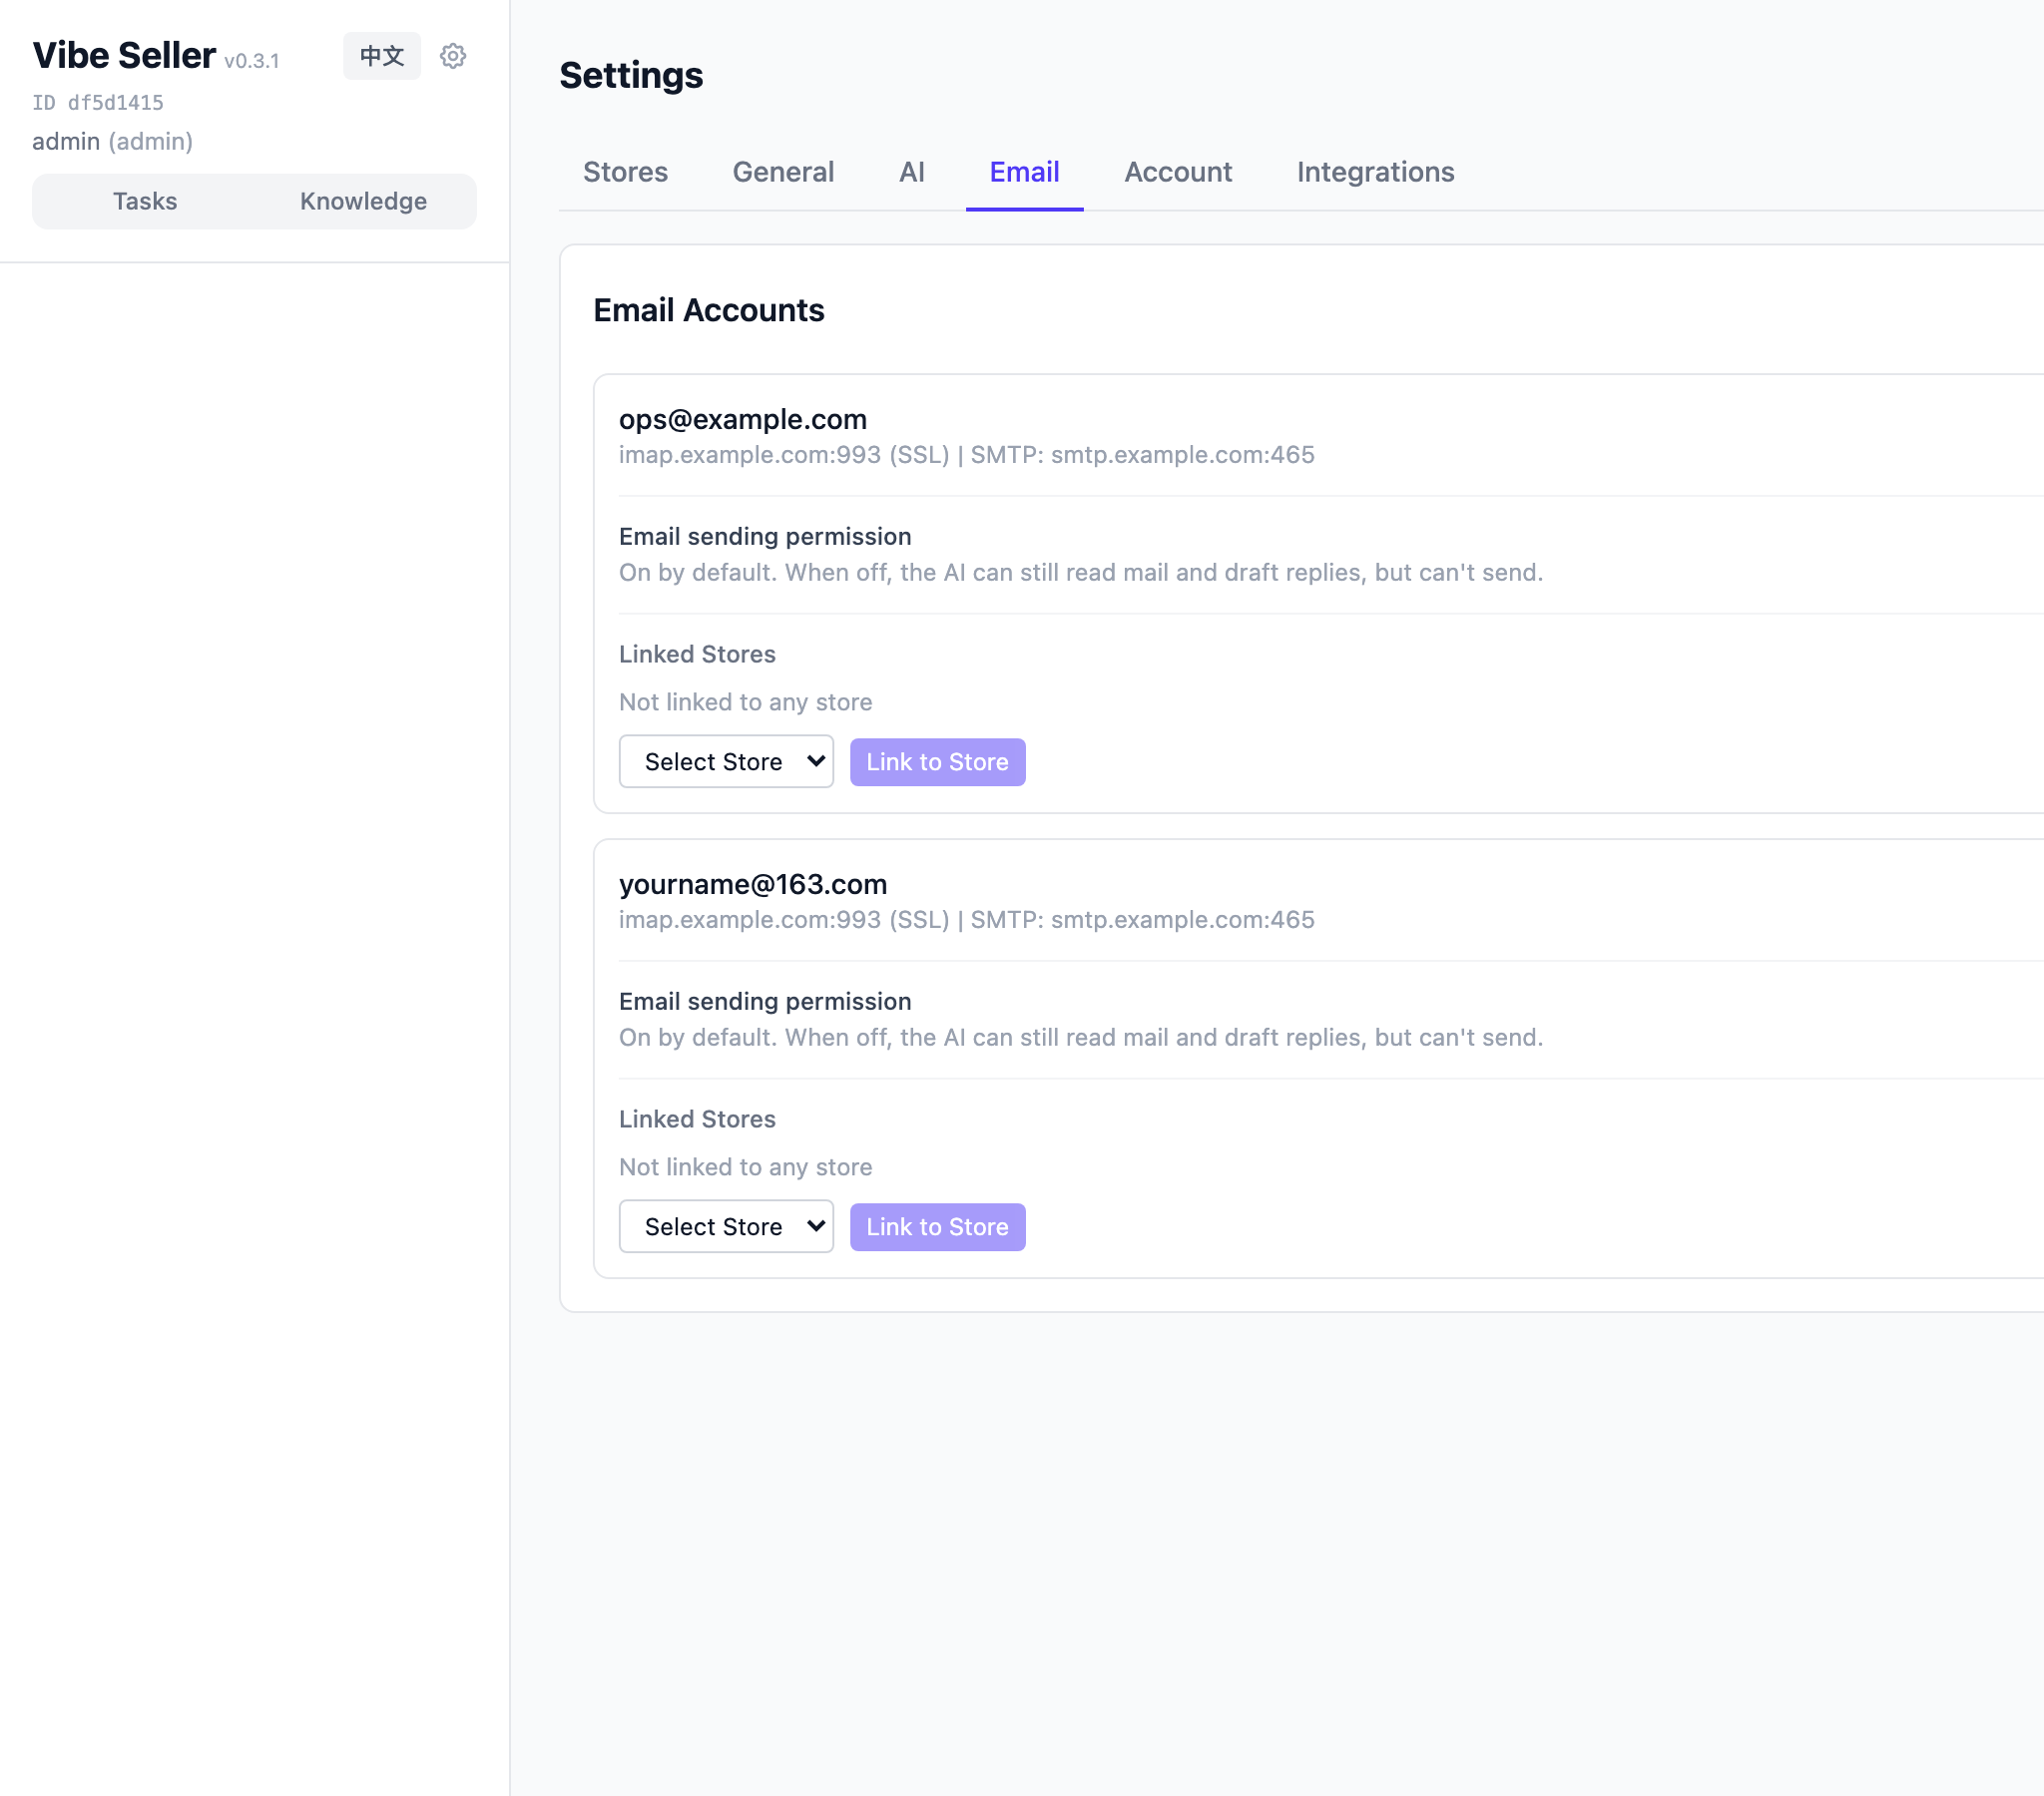
Click + Add Email:
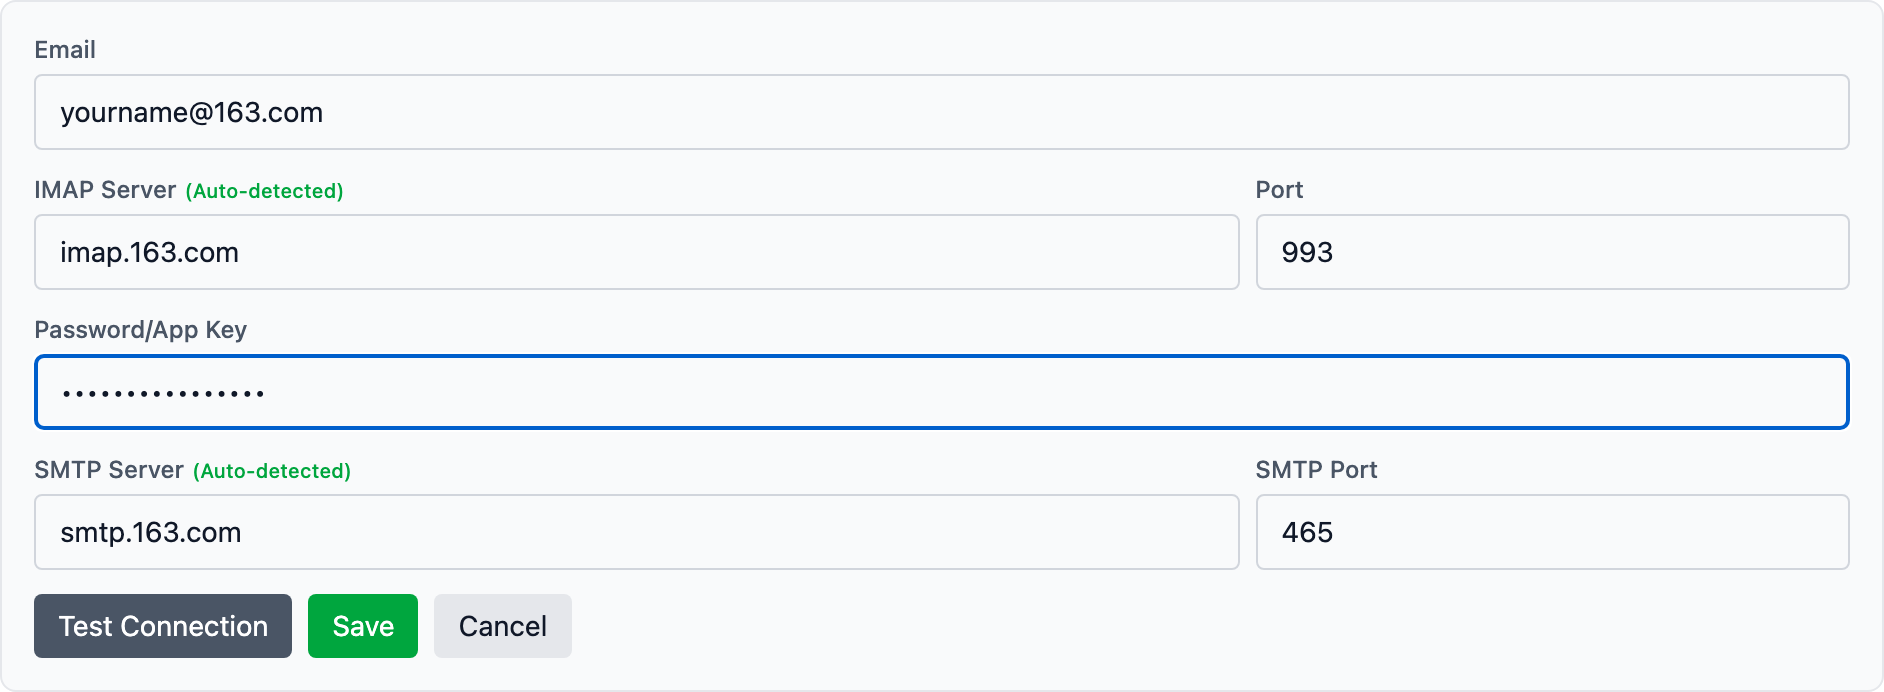
- Type the full address (e.g.
yourname@163.com) — when the field loses focus, the IMAP / SMTP servers are auto-detected (imap.163.com,smtp.163.com); - Paste the 16-character authorization code into "Password/App Key";
- Click Test Connection. Once it says "Connection successful", click Save.
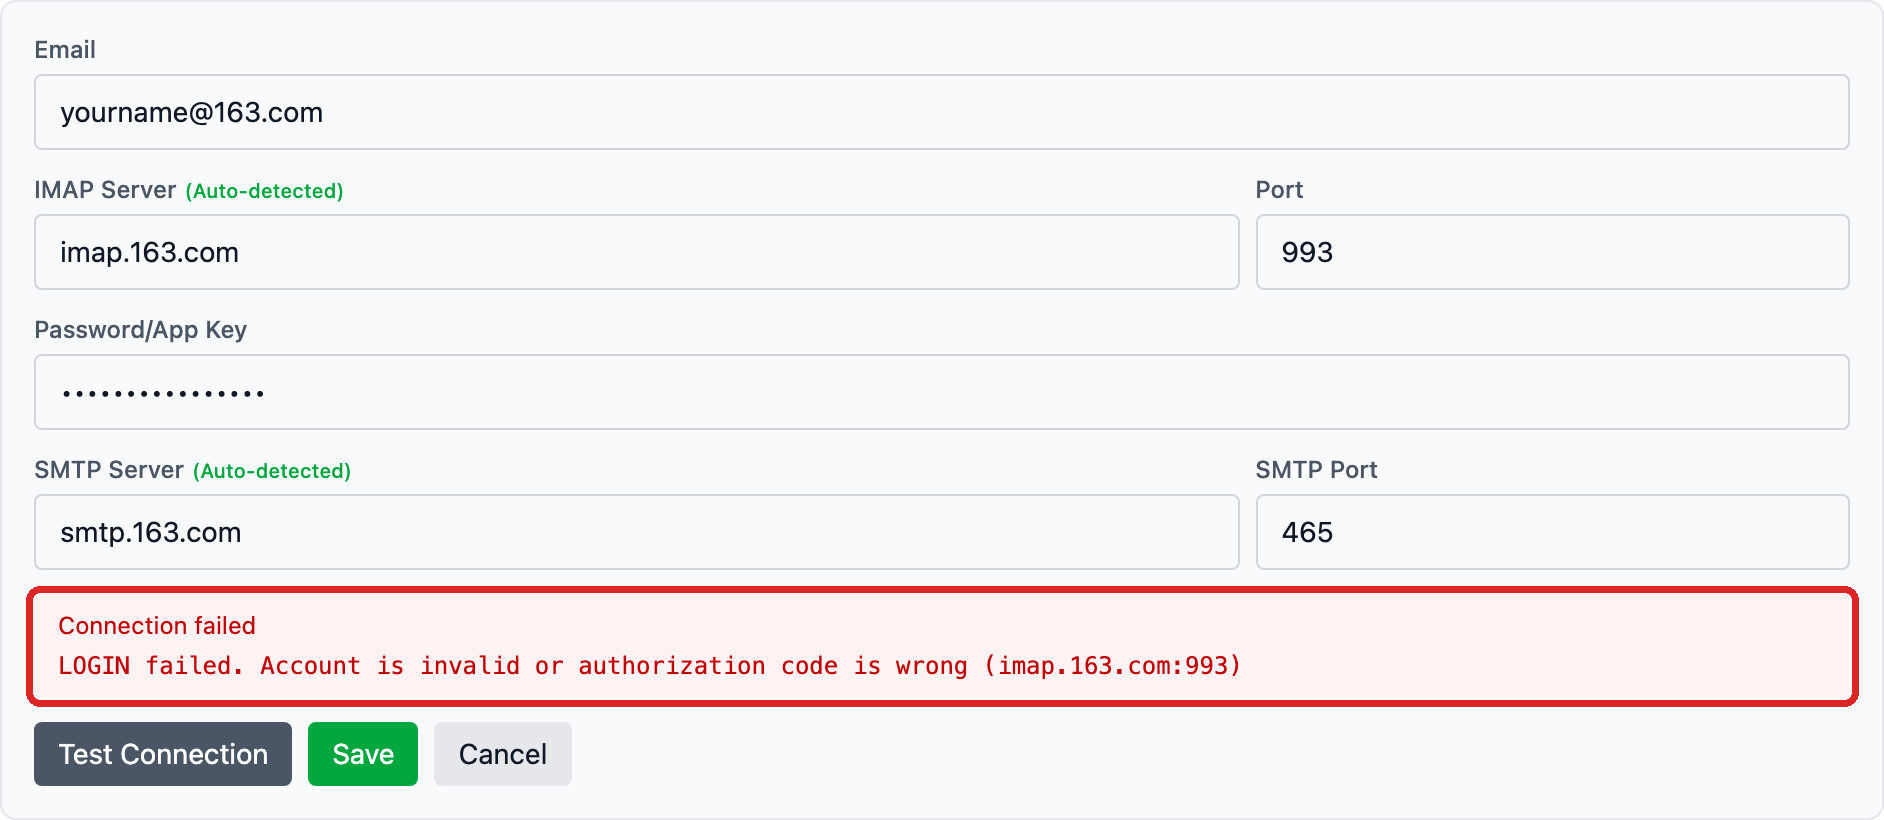
If the code is wrong or the service is off, the provider's real error appears in the red box — fix it and test again:
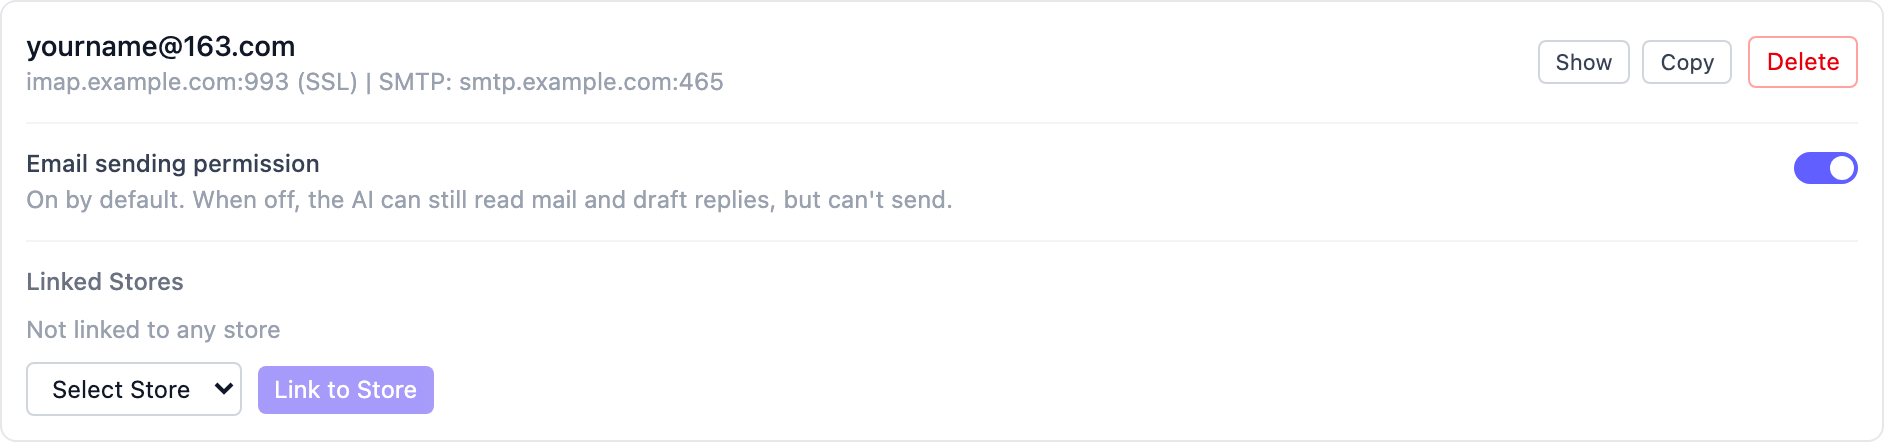
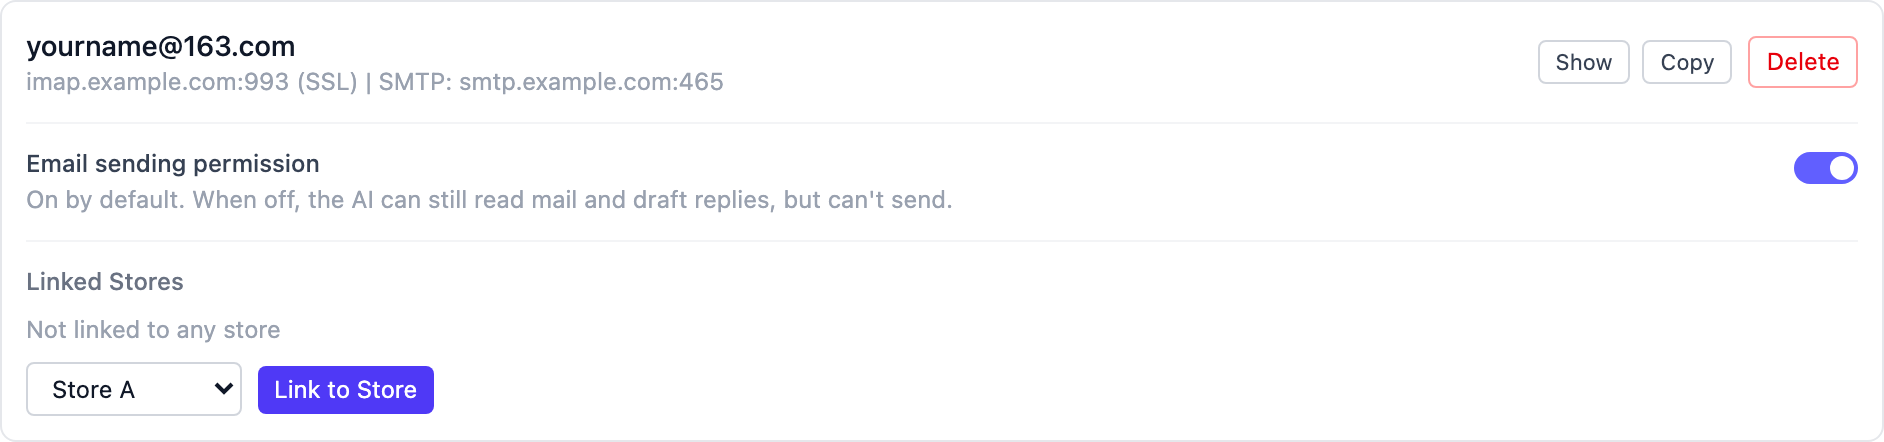
The mailbox now appears in the list. Click Link to Store to attach it to a store — only linked mailboxes are visible to the AI in that store's tasks.
QQ Mail
Step 1: Enable the service and get the code
- Sign in to QQ Mail on the web, open Settings → Account & Security at the top;
- Find "POP3/IMAP/SMTP/Exchange/CardDAV service" and turn IMAP/SMTP on;
- Verify by SMS with your bound phone number, then click "I have sent it";
- A 16-character authorization code pops up — this, not your QQ password, is what third-party clients sign in with. Copy and save it.
Forgot or leaked it? Reset under Settings → Account & Security → Device management → Authorization codes — old codes stop working immediately. (official guide)
Corporate mail (exmail)
Tencent Exmail addresses (you@yourcompany.com) use different
servers (imap.exmail.qq.com / smtp.exmail.qq.com). An
administrator must first open IMAP/SMTP in the admin console, then
you generate a client code under Settings → Email Associating
in the web mail. Enter those two servers manually when adding the
account. See the
Tencent guide.
Step 2: Add it in Vibe Seller
Same as NetEase: Settings → Email → + Add Email, address
yourname@qq.com, paste the 16-character code, Test Connection,
save, link to a store. QQ servers are auto-detected too (imap.qq.com,
smtp.qq.com).
Gmail
Gmail uses an app password instead of your login password, and requires 2-Step Verification first.
Step 1: Turn on 2-Step Verification
- Open your Google Account security page;
- Under "How you sign in to Google", start 2-Step Verification and follow the prompts (official guide).
Step 2: Create an app password
- With 2-Step Verification on, open the App passwords page;
- Pick "Other (custom name)", name it something recognisable (e.g.
vibe-seller) and click Generate; - Google shows a 16-character password in four groups — copy it. When you paste it into Vibe Seller, ignore the spaces and enter it as one unbroken string.
Google Workspace (work / school) accounts
On a managed Google Workspace account the administrator may have disabled IMAP or app passwords. If you cannot find the "App passwords" page or the "Forwarding and POP/IMAP" tab, ask your administrator.
Step 3: Add it in Vibe Seller
Settings → Email → + Add Email, address yourname@gmail.com, paste
the 16-character app password (no spaces), Test Connection, save,
link to a store. Servers auto-detect to imap.gmail.com /
smtp.gmail.com.
Outlook / Hotmail: not supported
Outlook.com, Hotmail and Live mailboxes cannot be connected.
Microsoft has retired password sign-in (Basic Authentication) — those
accounts require OAuth2, while Vibe Seller connects with
an authorization code / password. Clicking "Test Connection" with an
Outlook mailbox shows the provider's own error
(Basic authentication is disabled.); it is not a configuration
problem.
If you need those messages, forward Outlook mail to a supported
mailbox first.
Verify
Three quick checks:
- Test Connection says "Connection successful" — this checks incoming (IMAP) access;
- After Save, the mailbox is in the list and linked to a store;
- Create a task asking what's the latest mail in this mailbox? — if the AI reports recent subjects and senders, you are done.
Turn off the email sending permission
Every mailbox can send by default: the AI can read, sort, draft and send. If you don't want the AI sending from a mailbox (say, read and draft only), turn off its email sending permission per mailbox:
- Go to Settings → Email and find the mailbox in the list;
- Turn off the "Email sending permission" switch on its card (grey means off);
- Each mailbox is separate: turning it off for mailbox A leaves mailbox B sending as usual.
To allow sending again, turn the same switch back on.
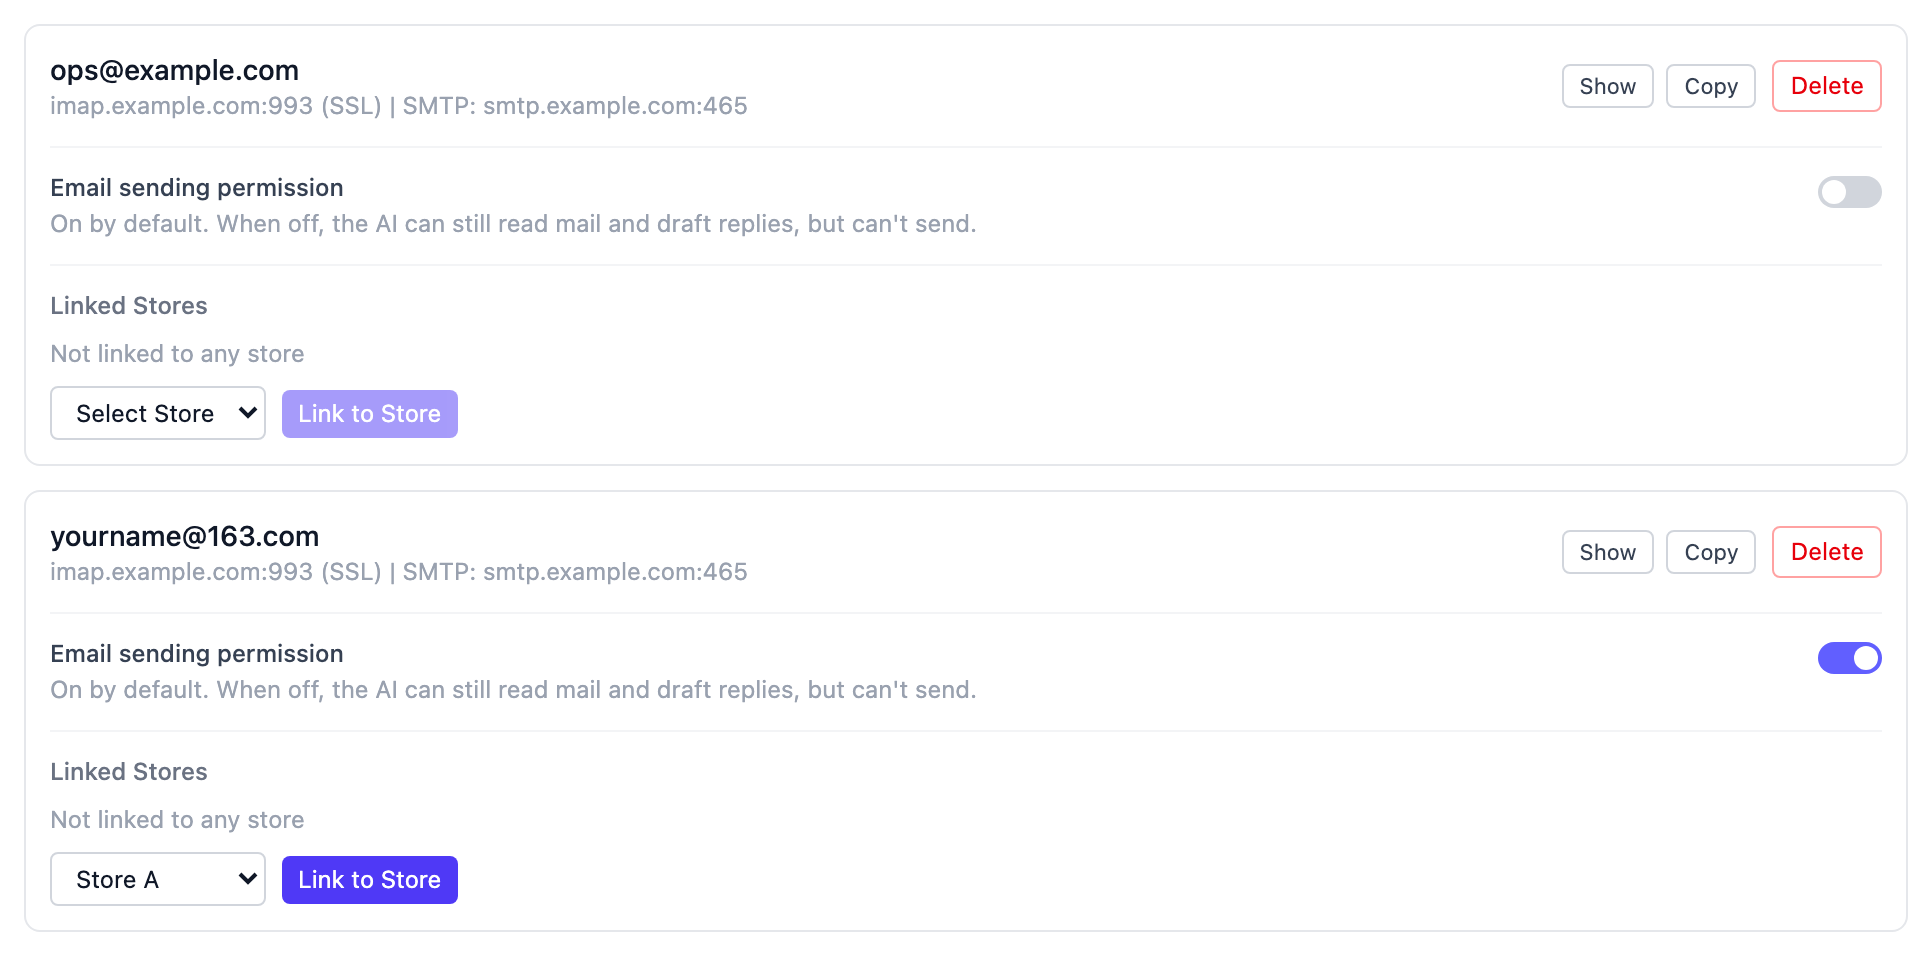
Verify: create a task asking the AI to "send a test email from this mailbox to me" (give it another inbox of yours). With the switch on, the mail arrives within a few minutes; with it off, the AI tells you sending from that mailbox has been turned off and shows you the draft instead.
Changes take effect immediately. The rule is enforced on the server, not left to the AI: a mailbox with sending turned off cannot send, whatever the task says.
Only you can change the switch, signed in to the web UI: neither the AI inside a task nor an external AI client using an API key can. This holds while login is turned on — if you turn login off in Settings, the server cannot tell the web UI apart from an AI's request that carries no credential, so the switch cannot stop an AI that sets out to get around it. Keep login on if several people use the instance or this matters to you.
What the AI can do with it
- Read mail: search the inbox by subject / sender / time, read bodies and attachment lists. Mail syncs to a local database every 5 minutes, and a task can trigger an immediate sync;
- Sort and summarise: group messages by your rules, extract the key points, turn threads into tables or lists;
- Send mail: draft replies and send them as instructed. Each mailbox's "Email sending permission" switch is on by default and you can turn it off per mailbox (see Turn off the email sending permission). While it is off, the AI shows you the drafted email so you can send it yourself or turn the switch back on and ask again. Asking show me before sending in the task keeps you in the loop.
Mail stays inside your own deployment: the mailbox password is stored encrypted, messages sync into a local database, and the AI accesses them through controlled tools.
FAQ
"Test Connection" fails with "LOGIN Login error or password error"?
The mail server rejected the sign-in. Almost always one of:
- Wrong authorization code — or you entered the login password. For 163 / QQ Mail the field must hold the 16-character code;
- IMAP/SMTP is switched off — check the provider's web settings.
Fix it and test again — the exact reason is shown in the red box.
It says "This mailbox is already added"?
The mailbox is already in the list. To rotate the authorization code, delete the old entry first, then add it again with the new code.
QQ Mail only shows the last 30 days?
QQ Mail hands third-party clients the last 30 days by default. In the web mail under Settings → Account & Security, change the fetch option from "Last 30 days" to "All".
What if the servers are not auto-detected?
Auto-detection covers the common providers (163 / 126 / yeah.net, QQ,
Gmail, …). For other domains it guesses imap.yourdomain.com, which is
often wrong — fill in the servers your provider documents instead.
IMAP is usually port 993 (SSL); SMTP is 465 (SSL) or 587.
The AI says it found no new mail?
Mail syncs automatically every 5 minutes — wait a moment or ask the task to sync now and check again. Also make sure the mailbox is linked to the store: unlinked mailboxes are invisible to that store's tasks.
The AI says it can't send email?
If the AI replies that sending from a mailbox has been turned off, that mailbox's "Email sending permission" switch was turned off (mailboxes start with it on, so someone switched it off in Settings). Go to Settings → Email, turn it back on on that mailbox's card, and ask the task to send again.
If the switch is on and sending still fails, check two things: the card shows an SMTP server (with "No SMTP" it cannot send), and the authorization code / app password is still valid (sending uses it too).
How do I rotate the code or remove a mailbox?
When the code changes: delete the old entry, then add the mailbox again with the new code. Deleting also unlinks its stores; the mail itself is untouched.
Does Outlook / Hotmail work?
Not at the moment — see Outlook / Hotmail. Microsoft requires OAuth2 now that password sign-in is gone.